


Connecting rods are among the strongest components inside a diesel engine. Built from forged steel or powdered metal, they are designed to withstand enormous combustion pressures and transfer thousands of pounds of force every second from the piston to the crankshaft.
Because they are so robust, connecting rods rarely fail on their own.
When a connecting rod bends, breaks, or suffers bearing damage, it is almost always the result of another underlying problem. Oil starvation, bearing failure, overheating, improper assembly, hydrolock, overspeed, or using outdated components during an engine overhaul can all lead to connecting rod damage.
That is why replacing a damaged connecting rod without identifying the original cause often leads to another expensive engine failure.
This failure analysis walks through one real-world example of connecting rod damage, explains why it happened, and highlights other common causes of connecting rod failure so you can diagnose the root cause—not just replace broken parts.
What Does a Connecting Rod Do?
The connecting rod is the link between the piston and the crankshaft.
As combustion pushes the piston downward, the connecting rod transfers that force to the crankshaft, converting the piston’s linear motion into the rotational motion that ultimately powers the engine.
Every connecting rod consists of several critical areas:
- Small end (wrist pin bore)
- Connecting rod beam
- Big end
- Connecting rod bearing
- Rod cap
- Connecting rod bolts
Some diesel engines also use drilled connecting rods, which contain an internal oil passage that directs pressurized engine oil toward the wrist pin and piston for additional lubrication and cooling. When manufacturers release updated connecting rod designs, these improvements are often intended to improve lubrication, durability, and overall engine life.
Ignoring those updates during an overhaul can create problems that may not appear until thousands of miles later.
Common Symptoms of Connecting Rod Failure
Connecting rod problems often begin long before the rod itself fails.
Recognizing the warning signs early may help prevent catastrophic engine damage.
1. Low Oil Pressure
Bearing wear or oil starvation can reduce oil pressure throughout the engine.
2. Rod Knock
A worn connecting rod bearing often produces a deep metallic knocking noise that becomes more noticeable under load.
3. Metal in the Engine Oil
Bearing material circulating through the lubrication system is often an early indicator of internal engine damage.
4. Loss of Power
Severe bearing wear or connecting rod damage can reduce engine efficiency and overall performance.
5. Engine Seizure
If bearing failure progresses, the connecting rod may seize on the crankshaft journal, resulting in catastrophic engine failure.
While these symptoms may indicate connecting rod problems, they can also point toward oil pump failure, main bearing damage, crankshaft wear, or lubrication system issues.
A complete inspection is always recommended before replacing parts.
Failure Analysis: Cylinder Kit Failure Caused by Improper Lubrication
One of the most expensive mistakes during an engine overhaul is assuming that only the visibly damaged components need to be replaced.
Engine manufacturers frequently release updated components that improve lubrication, durability, or reliability. Reusing an older design simply because it “still fits” can lead to repeat failures, even if every other new component was installed correctly.
The following failure demonstrates exactly why following overhaul recommendations matters.
What We Observed
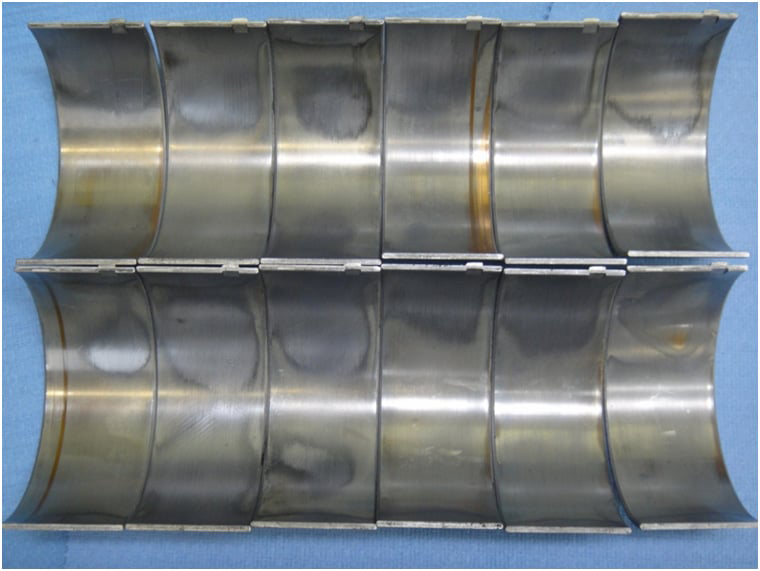
During inspection, the engine showed evidence of severe lubrication-related failure throughout the cylinder assembly.
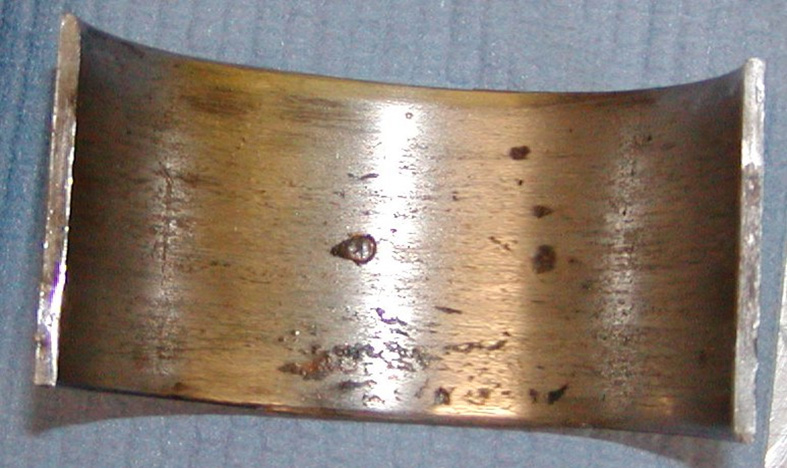
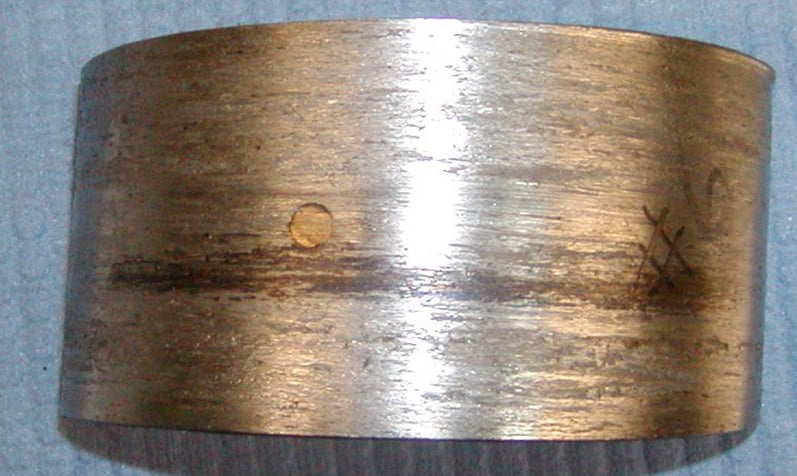
These first images below show spun connecting rod bearings.


A spun bearing occurs when the bearing loses its protective oil film and begins rotating inside the connecting rod instead of remaining locked in place. Once this happens, oil clearance disappears, lubrication rapidly deteriorates, temperatures increase dramatically, and major engine damage can occur within seconds.
The damage pattern immediately suggested a lubrication problem rather than a defective bearing.
Looking Deeper
Further inspection of the connecting rod revealed something important.
The lower portion of the connecting rod did not contain the updated drilled oil passage specified by the engine manufacturer.

Unlike the updated design, this connecting rod could not provide the additional oil flow needed to lubricate and cool the piston pin assembly.
During the overhaul, the connecting rod had not been updated to the recommended drilled version.
While every other major component may have been replaced correctly, this one outdated component created a weak point in the lubrication system.
Looking Deeper
The next photo shows the lower portion of the connecting rod that supports the connecting rod bearing.
Notice that this rod does not contain the drilled oil passage that feeds pressurized engine oil to the piston pin.
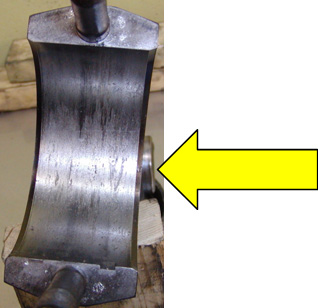
Unlike the updated OEM design, this connecting rod cannot provide the additional oil flow needed to lubricate and cool the piston pin assembly.
During the overhaul, the connecting rod was not updated to the recommended drilled version.
While every other major component may have been replaced correctly, this one outdated component created a weak point within the engine’s lubrication system.
What Happened Next?
Once lubrication was lost, bearing temperatures increased rapidly.
As friction continued to rise, the damage spread beyond the bearing and into the connecting rod, piston, and cylinder assembly.
The photo below shows the catastrophic result.
The piston skirt and cylinder liner have been almost completely destroyed, leaving only the damaged connecting rod and remnants of the piston assembly.
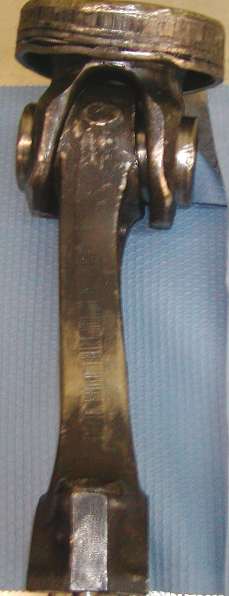
At this stage, replacing a single connecting rod or bearing is no longer an option. A complete inspection of the crankshaft, cylinder block, lubrication system, piston cooling system, and remaining rotating assembly is necessary before rebuilding the engine.
The Damage Didn’t Stop There
Lubrication failures rarely affect only one component.
As temperatures continued to increase, even the piston cooling hardware suffered extensive damage.
The image below shows what remained of the piston cooler after the failure occurred.
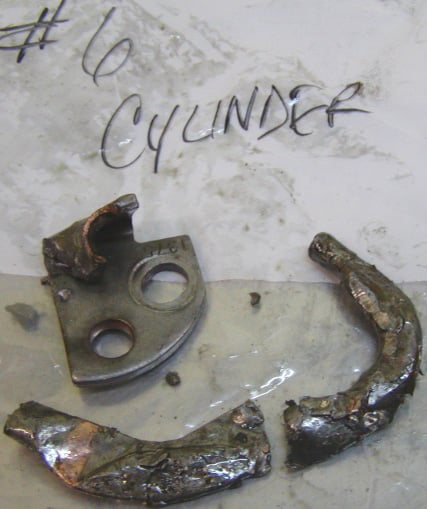
Once an engine reaches this level of damage, secondary failures become common. Metal debris circulates through the lubrication system, bearings lose their oil film, pistons overheat, cylinder liners become damaged, and additional rotating components may require replacement.
Most Likely Root Cause
Based on the observed damage, this failure was not caused by a defective connecting rod.
Instead, the evidence indicates a lubrication-related failure that began after an engine overhaul where the recommended drilled connecting rod was not installed.
Without adequate lubrication reaching critical moving components, the connecting rod bearing failed first. That failure progressed into piston damage, cylinder kit failure, and ultimately widespread engine damage.
This is an excellent example of why following OEM overhaul recommendations—and updating components when specified—is just as important as replacing worn parts.
Oil Supply Reduced → Bearing Loses Oil Film → Bearing Overheats → Bearing Spins → Connecting Rod Damage → Piston Failure → Cylinder Kit Failure → Catastrophic Engine Damage
What This Failure Tells Us
This failure was not caused by a defective connecting rod or a defective bearing.
The damage pattern points to insufficient lubrication.
Without an adequate oil film separating the bearing from the crankshaft journal, metal-to-metal contact occurs almost immediately. Friction increases, temperatures rise rapidly, and the bearing material begins to wear away. As lubrication continues to deteriorate, the bearing can seize to the crankshaft journal and rotate inside the connecting rod bore—a condition commonly referred to as a spun bearing.
Once a bearing spins, the connecting rod is often damaged beyond repair, and the crankshaft journal may also require machining or replacement.
In this case, the failure was traced back to the use of an older-style connecting rod that was not updated during the overhaul.
Why OEM Updates Matter During an Engine Overhaul
Engine manufacturers continuously improve component designs based on years of field experience.
These updates may seem minor—a revised bearing material, a redesigned oil passage, a stronger fastener, or a drilled connecting rod—but they are often introduced to correct known durability concerns.
When rebuilding an engine, it is important to follow the manufacturer’s recommended updates whenever possible.
Using older components simply because they are reusable can unintentionally recreate a known weakness within the engine.
For engines that specify an updated drilled connecting rod, the additional oil passage provides improved lubrication to the piston pin and helps carry heat away from critical moving components. Failing to install the updated design can reduce lubrication where it is needed most and contribute to premature bearing failure.
A successful overhaul is about more than replacing worn parts—it’s about building the engine to the latest proven standard.
Other Common Causes of Connecting Rod Failure
Although lubrication problems are among the most common causes of connecting rod damage, they are certainly not the only ones.
Oil Starvation
Low oil level, a failing oil pump, clogged oil passages, or restricted pickup tubes can quickly destroy connecting rod bearings.
Bearing Failure
Improper bearing clearances, contaminated oil, or excessive wear can allow bearings to overheat and eventually spin.
Hydrolock
If coolant, water, or excessive fuel enters the combustion chamber, liquids cannot compress like air. The sudden pressure spike can bend or break a connecting rod.
Engine Overspeed
Excessive RPM dramatically increases the tensile loads placed on connecting rods and rod bolts, potentially resulting in catastrophic failure.
Improper Torque Procedures
Connecting rod bolts must be tightened exactly according to the manufacturer’s specifications. Incorrect torque or bolt reuse can reduce clamping force and damage the connecting rod assembly.
Abrasive Contamination
Dirt, debris, or contaminated engine oil accelerates bearing wear and reduces lubrication throughout the engine.
Many of these conditions begin long before the connecting rod actually fails.
By the time the rod is visibly damaged, the underlying problem has often been affecting the engine for hundreds—or even thousands—of miles.
Inspect More Than Just the Connecting Rod
Whenever a connecting rod failure is discovered, the inspection should extend well beyond the damaged component.
A complete diagnosis should include:
- Connecting rod bearings
- Main bearings
- Crankshaft journals
- Oil pump
- Oil pickup tube and screen
- Lubrication passages
- Cylinder liners
- Pistons and wrist pins
- Cooling system
- Engine oil condition
- Oil filter
- Connecting rod bolts
Replacing only the visibly damaged connecting rod without identifying the original cause often results in repeat failures.
Successful engine rebuilds are built on careful inspection—not assumptions.
How to Prevent Connecting Rod Failure
Although connecting rods are designed to withstand millions of combustion cycles, they depend on proper lubrication, correct bearing clearances, and careful assembly to survive. Most connecting rod failures can be prevented by following proven engine rebuilding and maintenance practices.
✔ Maintain proper engine oil level and use the manufacturer’s recommended oil viscosity.
✔ Replace worn connecting rod bearings during an overhaul and verify all bearing clearances meet specification.
✔ Inspect the crankshaft journals for wear, scoring, taper, and out-of-round before reassembly.
✔ Replace connecting rod bolts whenever recommended by the engine manufacturer. Many are torque-to-yield fasteners and should not be reused.
✔ Follow OEM recommendations for updated connecting rods, oil passages, and other revised components.
✔ Keep the lubrication system clean by replacing oil filters at recommended intervals and preventing contamination during assembly.
✔ Prime the lubrication system before initial startup after an overhaul to ensure bearings receive oil immediately.
A successful rebuild isn’t simply about installing new parts. It’s about ensuring every component receives the lubrication, cooling, and support it was designed to have.
Connecting Rod Failure Is Usually a Symptom—Not the Root Cause
One of the biggest misconceptions about connecting rod failures is that the rod itself is the problem.
In reality, connecting rods are incredibly durable. Most failures occur because another component failed first.
A worn bearing, restricted oil passage, low oil pressure, contaminated engine oil, or an incomplete overhaul can all lead to connecting rod damage.
By the time the rod fails, the original problem has often been developing for a long time.
That is why experienced engine builders don’t stop after replacing the broken rod.
They inspect the entire lubrication system, crankshaft, bearings, pistons, cylinder liners, and oil passages to make sure the original cause has been corrected.
Doing so greatly reduces the chance of another expensive engine failure.
Need Connecting Rods or Engine Rebuild Parts?
Whether you’re replacing a damaged connecting rod, rebuilding an entire engine, or diagnosing an internal lubrication problem, using quality components—and correcting the original cause of the failure—is essential for long-term reliability.
Looking for Diesel Engine Rebuild Parts?
Highway and Heavy Parts offers connecting rods, bearings, crankshafts, pistons, cylinder liners, gasket sets, and complete engine rebuild kits for many of the industry’s most popular diesel engines.
Final Takeaway
Connecting rods are among the strongest components in a diesel engine, but they depend on proper lubrication, healthy bearings, and correct assembly procedures to do their job.
When a connecting rod fails, it is usually pointing to another problem—not acting as the root cause itself.
Whether the issue is oil starvation, a spun bearing, hydrolock, overheating, or an outdated component left in service during an overhaul, identifying the underlying cause is the key to preventing repeat failures.
Successful engine repairs are built on careful diagnosis, thorough inspection, and replacing more than just the visibly damaged parts.
By understanding what caused the failure—and correcting it before the engine goes back together—you can improve reliability, reduce downtime, and help ensure your rebuild performs the way it was designed to.
If you have questions about connecting rods, overhaul kits, or choosing the right replacement parts for your diesel engine, our ASE Certified Technicians are here to help.
Call 844-304-7688 or visit highwayandheavyparts.com.
From diagnosis through delivery, we’re Highway and Heavy Parts.


