Keyword Search

Posted on

More Than a Diesel Engine Part: What to Expect From Your Parts Supplier After the Sale

Anybody can sell you a diesel engine part.

There are plenty of places to purchase parts for Caterpillar, Cummins, Detroit Diesel, and other heavy-duty engines. When the correct part arrives and the repair goes as planned, one diesel engine parts supplier may seem much like another.

The difference becomes much clearer when something goes wrong after the purchase.

Price, availability, and shipping speed all matter when a truck or piece of equipment is down. But there is another question worth asking before you choose a supplier:

What happens if I have a problem after I install the part?

A dependable supplier should still be there after the sale. That means helping you understand what information is needed, guiding you through the applicable warranty process, and helping investigate why the component failed.

But there is an important distinction to make:

A failed part tells you what stopped working. It does not automatically tell you why it failed.

Why Does a Diesel Engine Part Fail?

When a newly installed component fails, it is understandable to think, “The part was bad.”

Sometimes a manufacturing defect is the cause. In other cases, the failure may be related to the installation, another engine system, the operating conditions, or an incorrect application.

Depending on the component and engine, possible causes may include:

  • A manufacturing defect
  • An installation issue
  • Oil, fuel, or debris contamination
  • Insufficient lubrication or restricted oil flow
  • Fuel-system problems
  • Overheating
  • Another failing engine component
  • An incorrect part or application

Determining what failed and determining why it failed are two different things.

That distinction matters during any diesel engine parts warranty review. Confirming that a component no longer works is only one part of the process. The available evidence must also be reviewed to understand what may have caused the failure and whether the issue falls within the applicable warranty terms.

Why Doesn’t Replacing the Part Always Solve the Problem?

Replacing a failed component may get the repair moving again, but it does not correct an underlying engine, system, or installation problem.

If the root cause is still present, the replacement part may be exposed to the same damaging conditions.

Turbocharger Example

A turbocharger depends on proper oil supply and drainage. If inadequate lubrication contributed to the original turbo failure, installing another turbo without correcting the oil-flow problem may put the replacement at risk.

The failed turbo needs attention, but so does the condition that caused it to fail.

Fuel Injector Example

Fuel injectors can be damaged by contamination in the fuel system. Replacing the injector without correcting the source of the contamination may leave the replacement vulnerable to the same damage.

In both examples, the failed component may be where the problem appeared. It may not be where the problem started.

Don’t ask only, “Did the part fail?” Ask, “What caused it to fail?”

What Should a Good Diesel Engine Parts Supplier Do When Something Goes Wrong?

A good heavy-duty diesel parts supplier should do more than send you a warranty form and disappear.

The exact process varies by product and manufacturer, but helpful after-sale support should include several basic steps.

Understand What Happened

The supplier should ask about the symptoms, engine application, installation, and circumstances surrounding the failure. These details provide context that the failed component alone may not reveal.

Gather the Right Information

Photos, diagnostic findings, engine information, installation details, mileage or operating hours, and service records may help explain what occurred.

Complete information can also help prevent delays if the manufacturer requires specific documentation to review the claim.

Evaluate the Failed Component

When appropriate, the failed component may need to be retained, inspected, or returned for additional evaluation.

Do not throw it away or disassemble it until you receive instructions. Its condition may be important to the review.

Work With the Manufacturer

If the issue qualifies for warranty review, the supplier can help organize the information the manufacturer requires and support the claim through the applicable process.

The manufacturer or warranty provider ultimately determines coverage under its warranty terms.

Keep You Informed

You should understand what information is needed, whether the component must be returned, and what happens next.

A supplier may not be able to provide an immediate decision, but it should communicate clearly throughout the process.

Have a question about a part or warranty process? Call HHP at 844-304-7688. Our team can help you identify the information needed for the next step.

Why Does HHP Ask for Photos and Information?

If HHP asks for photos, installation details, diagnostic findings, or the failed component, those requests are not simply extra paperwork.

A warranty review may depend on details that are not visible from a part number or order record. Photos can document the damage. Installation information can show how the component was fitted. Diagnostic results can help explain what the engine was doing before and after the failure.

The failed component itself may also contain physical evidence that helps identify what happened.

The goal is not only to confirm that a part failed. It is to understand why it failed.

Providing complete information helps HHP and the applicable manufacturer evaluate the situation as accurately and efficiently as possible.

What Information Should You Save If a Part Fails?

If a diesel engine part fails, do not immediately throw it away or make additional changes. First, find out what the diesel parts warranty process requires.

Keep the following information when available:

  • The failed component and its packaging
  • Clear photos of the complete component
  • Close-up photos of visible damage
  • Your invoice, order number, or other purchase information
  • The engine serial number and application information
  • Installation records and the installer’s findings
  • Mileage or operating hours at installation and failure
  • Diagnostic codes, test results, or technician notes
  • A description of the symptoms and what happened before the failure

Warranty requirements vary by product, brand, and manufacturer. Contact your supplier as soon as possible so you know what must be documented, whether the part must be returned, and which steps to follow before continuing the repair.

Does a Warranty Decision Solve the Entire Problem?

Not always.

A warranty approval can help address the cost of a covered component. It does not automatically correct the condition that caused the component to fail.

The repair may still require:

  • An accurate diagnosis
  • The correct replacement part
  • Correction of the underlying engine, system, or installation problem
  • Verification that the complete system is ready to return to service

At HHP, our goal is not only to help process a warranty claim. We want to help customers work toward the right solution and get their equipment back to work as quickly as the situation allows.

What Support Should You Expect Before, During, and After the Sale?

The value of a diesel engine parts supplier should be clear throughout the purchase, not only when the order is placed.

Before the Sale

The first step is identifying the correct component for the engine and application.

Whether you need an injector, turbocharger, cylinder head, rebuild kit, gasket set, or another engine component, accurate engine information helps reduce the risk of ordering the wrong part.

HHP supports customers working on Caterpillar, Cummins, Detroit Diesel, and other heavy-duty engines, with aftermarket diesel engine parts and other available product options depending on the application.

During the Sale

You should understand the available product options, availability, product condition, core requirements, and other purchasing considerations before placing the order.

Clear information helps you choose the option that fits the repair, schedule, and budget.

After the Sale

If an issue develops, HHP is still available to help gather information, review what happened, explain the applicable warranty procedure, and coordinate with the manufacturer when required.

You are not only buying the component. You are also choosing the support available after the sale.

Why Does Your Diesel Parts Supplier Matter?

Price matters. Availability matters. Shipping speed matters. Product quality matters.

Support matters too, especially when a truck or piece of equipment is down and the repair has not gone as expected.

At that point, you are going to care about practical questions:

  • Can I reach someone who will help?
  • Does the supplier understand these engines and components?
  • Will the supplier help me gather the information needed to investigate the failure?
  • Can the supplier guide me through the applicable warranty process?
  • Will the supplier continue communicating after the sale?

The answers show the difference between a website that lists diesel parts and a supplier that is prepared to support the customer when the repair becomes more complicated.

Need Help Finding the Right Diesel Engine Part?

Whether you are working on a Caterpillar, Cummins, Detroit Diesel, or another heavy-duty engine, Highway & Heavy Parts can help you identify the parts you need and provide support when you need it after the sale.

Have your engine serial number, application information, and current part information available when you call so our parts specialists can help identify the correct option for your repair.

Call HHP: 844-304-7688

From Diagnosis to Delivery, we are Highway & Heavy.

Posted on

Turbocharger Failure Symptoms: How to Spot the Warning Signs Before It Fails

Turbochargers rarely fail without warning. A loss of power, unusual noise, increased oil consumption, or excessive smoke can all be signs that something in the turbocharger system needs attention.

The good news is that you may be able to spot some of the most common turbocharger failure symptoms with a quick inspection before the problem turns into unexpected downtime or a more extensive repair.

But there’s an important distinction to make:

A symptom isn’t the same thing as a diagnosis.

Many symptoms associated with a failing turbocharger can also be caused by problems elsewhere in the engine, intake, exhaust, or lubrication system. Before replacing a turbo, take the time to inspect it and determine what is actually causing the problem.

Here’s what to look for—and what a five-minute turbocharger inspection can tell you.

What Are the Most Common Signs of a Failing Turbocharger?

A failing turbocharger can show up in several ways. While no single symptom proves the turbo itself is bad, these warning signs are good reasons to investigate further.

Loss of Power or Slower Acceleration

One of the most noticeable signs of a bad turbo is a change in engine performance.

The turbocharger helps provide the airflow the engine needs to produce power. If the engine isn’t receiving the boost pressure it needs, you may notice reduced power, slower acceleration, or a truck that doesn’t respond the way it normally does.

However, low boost doesn’t automatically mean the turbocharger has failed. Charge-air leaks, intake restrictions, exhaust problems, and other engine issues can produce similar symptoms.

Unusual Whining or Whistling

Turbochargers naturally produce some noise during operation. What matters is a change from what is normal for your engine.

A new or unusually loud whining or whistling sound may indicate an airflow problem or another condition that requires inspection. Depending on the cause, changes in turbo noise can be associated with leaks, wheel damage, bearing wear, or other problems within the system.

Grinding or Scraping Noises

Grinding, scraping, or other mechanical noises are more concerning.

These sounds may indicate internal component damage or that the compressor or turbine wheel is contacting its housing. If you hear an abnormal mechanical noise coming from the turbocharger area, further inspection should be performed before continuing to operate the engine.

Excessive Exhaust Smoke

A noticeable change in exhaust smoke can also indicate that something isn’t operating correctly.

Smoke can have many causes, so it shouldn’t be used by itself to condemn a turbocharger. When excessive smoke appears alongside other symptoms—such as increased oil consumption, loss of boost, or abnormal turbo noise—it provides another reason to investigate.

Increased Oil Consumption

If the engine begins using more oil than usual, the turbocharger and its lubrication system may be among the areas worth checking.

Increased oil consumption can be associated with lubrication, sealing, drain, or other engine-related problems. Before replacing the turbocharger, determine where the oil is coming from and why.

Excessive Oil in the Compressor Housing or Charge-Air Piping

Finding oil in the turbo can immediately raise concerns, but it doesn’t automatically mean the turbocharger is bad.

A light oil film may be present under some operating conditions. Significant oil accumulation, particularly when combined with increased oil consumption or other symptoms, warrants further diagnosis.

The 5-Minute Turbocharger Inspection: What to Check

If you’ve noticed potential failing turbocharger symptoms, a quick visual inspection can help reveal obvious problems and determine whether further diagnosis is needed.

Before beginning, make sure the engine is shut down and the turbocharger has cooled sufficiently. Always follow the appropriate service procedures for your specific engine and application.

Step 1: Inspect the Compressor Wheel

Remove the intake piping as appropriate for the application so you can visually inspect the compressor wheel.

Look closely for:

  • Chipped fins
  • Cracked or bent blades
  • Signs of contact between the wheel and housing
  • Foreign-object damage
  • Other visible damage or abnormal wear

The compressor wheel should rotate freely without obvious contact with the housing.

Visible blade damage or evidence that the wheel has contacted the housing is a sign that additional inspection is needed before returning the engine to service.

Step 2: Check Turbo Shaft Play

With the compressor wheel accessible, check the turbocharger shaft for abnormal movement.

This is an area where it’s especially important not to jump to conclusions.

Some side-to-side, or radial, movement may be normal depending on the turbocharger design and whether the unit has oil pressure.

What should raise concern is excessive movement, evidence that the wheel is contacting its housing, or concerning in-and-out, or axial, movement.

There isn’t one universal measurement for acceptable turbo shaft play across every diesel turbocharger. Always refer to the specifications and service information for the specific turbocharger you’re inspecting when determining whether shaft movement is within limits.

Step 3: Look for Excessive Oil

While you’re inspecting the compressor side of the turbocharger, look for excessive oil accumulation.

A light oil film doesn’t automatically indicate a failed turbo. A significant amount of oil, particularly when accompanied by increased engine oil consumption, smoke, or other symptoms, deserves further investigation.

The important question isn’t simply:

“Is there oil in the turbo?”

It’s:

“Why is the oil here?”

Oil supply and drain issues, engine operating conditions, and other problems can contribute to oil appearing around the turbocharger or charge-air system.

Treat the oil as a symptom that needs to be investigated—not a diagnosis by itself.

Not sure what you’re seeing? Call HHP at 844-304-7688. Our parts specialists can help you identify the right next step for your application.

How Much Turbo Shaft Play Is Normal?

Because turbo shaft play is commonly used to judge turbocharger condition, it’s worth looking at more closely.

The turbocharger shaft connects components that operate at extremely high speeds. Depending on the bearing system and turbocharger design, some radial movement may be present when the engine isn’t running and oil pressure isn’t present.

That doesn’t automatically mean the turbo is failing.

Excessive movement becomes more concerning when the compressor or turbine wheel can contact its housing or when there is abnormal axial movement.

Rather than relying on a universal rule for how much movement is “too much,” compare the turbocharger against the manufacturer’s specifications for that particular unit.

Is Oil in the Turbocharger Normal?

Seeing oil around a turbocharger often leads to one immediate conclusion: the turbo is bad.

That’s not necessarily the case.

There is an important difference between a light oil film and excessive oil accumulation.

If you’re finding a significant amount of oil in the compressor housing or charge-air system, additional diagnosis is appropriate. However, oil around the turbocharger doesn’t prove that the turbo itself caused the problem.

The source of the oil and the operating conditions surrounding it matter.

That’s why oil in the turbo should be treated as another diagnostic clue rather than automatic proof that the turbocharger needs to be replaced.

Do These Symptoms Always Mean the Turbo Is Bad?

No.

This is one of the most important things to remember when diagnosing diesel turbo problems.

Loss of boost, smoke, increased oil consumption, and unusual noises can point you toward the turbocharger, but other problems can create similar symptoms.

Depending on the application and symptoms, diagnosis may also need to consider:

  • Charge-air leaks
  • Intake restrictions
  • Exhaust leaks or restrictions
  • Oil supply or drain problems
  • Other engine-related issues

That’s why replacing a turbocharger based on one symptom alone can lead to an expensive misdiagnosis.

Don’t ask only, “Is my turbo bad?” Ask, “What is causing this symptom?”

Inspecting the complete system can help determine whether the turbocharger is actually the root cause or simply where another problem is showing up.

Need help identifying your turbo or finding replacement options for your application? Call HHP at 844-304-7688 or shop our selection of replacement turbochargers.

What Happens If You Ignore a Failing Turbocharger?

If a turbocharger is actually damaged, continuing to operate the engine can allow the problem to become more severe.

Depending on the type of failure, potential consequences can include:

  • Additional compressor or turbine wheel damage
  • Loss of boost and engine performance
  • Increased oil consumption
  • Component or metal debris entering other parts of the system
  • Additional engine or aftertreatment concerns
  • Unexpected downtime

Catching an issue early gives you an opportunity to diagnose the cause before the failure progresses.

A quick inspection in the shop is considerably easier than dealing with a major failure on the road.

When Should You Inspect Your Turbocharger?

You don’t need to wait until the engine has completely lost boost or the turbocharger has stopped working.

Consider inspecting the turbocharger and related systems when you notice a new or unexplained:

  • Loss of power or slower acceleration
  • Whining, whistling, grinding, or scraping noise
  • Increase in exhaust smoke
  • Increase in oil consumption
  • Oil accumulation in the compressor housing or charge-air piping
  • Change in overall engine performance

A five-minute turbocharger inspection won’t diagnose every possible problem, but checking the compressor wheel, shaft movement, and oil accumulation can reveal obvious warning signs and help determine what needs to happen next.

The goal isn’t to find a reason to replace the turbo.

The goal is to correctly identify the problem before it becomes a bigger one.

Need Help Finding the Right Replacement Turbocharger?

If your inspection and diagnosis point to turbocharger replacement, Highway & Heavy Parts can help you find the correct turbo for your diesel engine application.

HHP carries replacement turbochargers for popular diesel applications, including International/Navistar engines, along with turbocharger options for other major diesel engine makes.

Have your engine information and current turbocharger information available when you call so our parts specialists can help identify the correct replacement for your application.

Shop Turbochargers

Call HHP: 844-304-7688

From Diagnosis to Delivery, we are Highway & Heavy Parts.

Posted on

How to Diagnose and Replace a Bad EGR Cooler

Detroit Diesel EGR Cooler

Modern diesel engines rely on the Exhaust Gas Recirculation (EGR) system to reduce emissions, and the EGR cooler plays a critical role in that process. By cooling exhaust gases before they are routed back into the intake system, the EGR cooler helps control combustion temperatures and reduce NOx emissions.

When a bad diesel EGR cooler develops an internal leak or becomes restricted, it can cause several performance and cooling system issues. Common warning signs include unexplained coolant loss, white exhaust smoke, and reduced engine performance.

Unfortunately, EGR coolers are not typically repairable. Once the cooler fails internally, the entire unit must be replaced. Because the EGR cooler is integrated into the engine’s cooling system, replacement also requires completely draining and refilling the coolant.

Understanding how to identify and replace a failed EGR cooler can help prevent more extensive engine damage and keep your diesel engine operating efficiently.

Symptoms of a Bad EGR Cooler

Several symptoms can point to a failing EGR cooler. However, many of these warning signs can also be caused by other engine problems, making proper diagnosis important before replacing parts.

Coolant Loss

One of the most common signs of a bad diesel EGR cooler is unexplained coolant loss. Internal cracks or leaks inside the cooler can allow coolant to enter the exhaust stream, causing the cooling system level to drop without any visible external leaks.

White Exhaust Smoke

When coolant enters the exhaust through a failed EGR cooler, it is converted into steam and exits through the tailpipe as thick white smoke. This symptom is often most noticeable during startup or under load.

It’s important to note that white exhaust smoke can also indicate a blown head gasket, cracked cylinder head, or other internal engine issues.

Sluggish Turbo Performance

A leaking or restricted EGR cooler can negatively affect exhaust flow and system efficiency. This can lead to sluggish turbocharger response, reduced power, and poor acceleration.

However, turbo lag and power loss can also result from boost leaks, turbocharger failures, clogged aftertreatment components, or intake system restrictions.

Check Engine Light and Fault Codes

Many engines will detect abnormal EGR system operation and trigger fault codes related to EGR flow, EGR temperature, or emissions system performance.

Because these codes can also be caused by faulty EGR valves, sensors, or wiring issues, additional testing is necessary before blaming the cooler itself.

How To Confirm a Bad EGR Cooler

Since many EGR cooler symptoms overlap with other engine problems, it’s important to properly diagnose EGR cooler failure before replacing components.

Tools Needed

  • Cooling system pressure tester
  • Basic hand tools
  • Flashlight or inspection light
  • Safety glasses and gloves
  • Service information for the engine

Perform a Cooling System Pressure Test

Begin by ensuring the engine is cool. Install a cooling system pressure tester and pressurize the system according to the manufacturer’s specifications.

Allow the system to sit while monitoring for pressure loss. If pressure drops without any visible external coolant leaks, coolant may be escaping internally through the EGR cooler.

In some cases, removing the exhaust connection from the cooler may reveal traces of coolant or moisture inside the exhaust passage.

Inspect the EGR Valve

Another effective way to diagnose EGR cooler failure is by visually inspecting the EGR valve.

Remove the EGR valve and examine the valve face and surrounding passages. A failed cooler often allows coolant vapor to pass through the EGR system. Over time, this steam can clean away normal carbon buildup, leaving portions of the valve unusually clean.

Technicians often refer to this as a “steam-cleaned” appearance. If one section of the valve looks significantly cleaner than the surrounding carbon deposits, coolant intrusion through the EGR cooler is a strong possibility.

Rule Out Other Cooling System Problems

Before replacing the cooler, inspect for:

  • Head gasket failures
  • Cracked cylinder heads
  • External coolant leaks
  • Faulty coolant reservoir caps
  • Damaged hoses or fittings

Confirming the root cause can prevent unnecessary repairs and repeat failures.

How To Replace the EGR Cooler

Once testing confirms a failed cooler, the next step is learning how to replace a bad EGR cooler. The exact procedure varies by engine model, but the general process remains similar.

Tools Needed

  • Socket and wrench set
  • Torque wrench
  • Screwdrivers
  • Pliers
  • Drain pan
  • Replacement EGR cooler
  • New gaskets and seals
  • Fresh coolant
  • Shop rags
  • Manufacturer service manual

Step 1: Allow the Engine to Cool

Never work on a hot cooling system. Allow the engine to cool completely before beginning repairs.

Step 2: Disconnect the Batteries

Disconnect the negative battery cables to prevent accidental electrical shorts while working around engine components.

Step 3: Drain the Cooling System

Place a drain pan beneath the radiator or cooling system drain point. Open the drain and completely drain the cooling system. Since the EGR cooler contains coolant passages, draining the system helps prevent spills and contamination during removal.

Step 4: Remove Components Blocking Access

Depending on the engine, you may need to remove:

  • Intake piping
  • Charge air tubes
  • Heat shields
  • EGR valve assemblies
  • Sensors and wiring harnesses

Label connections as needed to simplify reassembly.

Step 5: Disconnect Coolant and Exhaust Connections

Remove coolant hoses attached to the cooler. Next, disconnect the exhaust-side connections and mounting hardware securing the cooler to the engine.

Step 6: Remove the Old EGR Cooler

Carefully remove the failed EGR cooler from the engine compartment. Inspect the surrounding components for signs of coolant contamination, excessive carbon buildup, or damaged gaskets.

Step 7: Install the New EGR Cooler

Position the replacement cooler and install all mounting hardware according to the manufacturer’s torque specifications. Install new gaskets, seals, and any required replacement hardware.

Step 8: Reconnect Hoses and Components

Reconnect coolant lines, exhaust connections, sensors, wiring, intake tubing, and any other components removed during disassembly. Double-check all clamps and fasteners before proceeding.

Step 9: Refill the Cooling System

Refill the cooling system using the correct coolant recommended by the engine manufacturer. Use the proper coolant mixture and fill procedure to avoid introducing contaminants into the system.

Step 10: Bleed the Cooling System

Bleed trapped air from the cooling system according to manufacturer procedures. Air pockets can cause overheating, poor heater performance, and inaccurate coolant level readings.

Step 11: Verify the Repair

Start the engine and allow it to reach operating temperature.

Check for:

  • Coolant leaks
  • Proper coolant level
  • White exhaust smoke
  • Diagnostic trouble codes
  • Normal engine performance

After a road test, recheck coolant levels and inspect the repair area one final time.

Get Expert Help From Highway & Heavy Parts

A failed EGR cooler can lead to coolant contamination, emissions issues, and reduced engine performance. Proper diagnosis is critical because many symptoms of a bad diesel EGR cooler overlap with other cooling system and engine problems.

If you’re looking for replacement EGR components, engine parts, or expert technical support, the team at Highway & Heavy Parts is here to help. Contact us today for quality diesel parts, knowledgeable service, and guidance to keep your equipment running strong.

FAQs About How to Diagnose and Replace a bad EGR cooler

What are the most common signs of a bad EGR cooler?

The most common warning signs are unexplained coolant loss, thick white exhaust smoke (especially on startup or under load), sluggish turbo response, and check engine lights tied to EGR flow or temperature codes. Because these symptoms can overlap with other engine problems, it’s worth confirming the cause with a cooling system pressure test before ordering parts from the EGR & Aftertreatment category.

Can a bad EGR cooler cause white smoke from the exhaust?

Yes. When coolant leaks through cracked internal tubes in the EGR cooler, it enters the exhaust stream and turns to steam, which exits the tailpipe as white smoke. That said, white smoke can also point to a blown head gasket or cracked cylinder head, so it’s worth ruling those out with the right gaskets and seals on hand in case a cooling system inspection turns up more than just the cooler.

How do you confirm a bad EGR cooler instead of just guessing?

Run a cooling system pressure test and watch for pressure loss with no visible external leak, which points to coolant escaping internally. Pulling the EGR valve and checking for a “steam cleaned” patch where carbon has been washed away is another strong indicator. Replacement parts from the Cooling System category are only worth ordering once that diagnosis is confirmed.

Can a failing EGR cooler damage the turbocharger?

It can. Coolant and soot mixing together inside the EGR system can gum up the VGT turbo’s internal components and cause the vanes to stick, leading to sluggish boost or limp mode. This relationship between the EGR cooler and turbo performance is covered in more detail in how a bad EGR cooler can impact your VGT turbo, and in bad actuator or VGT turbo issues if turbo lag persists after the cooler is replaced.

Are EGR coolers repairable, or do they always need to be replaced?

EGR coolers are not field repairable once they develop an internal leak. The unit has to be replaced as a whole, and because it’s part of the engine’s coolant circuit, replacement also means fully draining and refilling the cooling system. Browse remanufactured and new units by engine make in the EGR & Aftertreatment category.

Do you need to replace the EGR valve at the same time as the EGR cooler?

Not always, but it’s worth inspecting closely. If coolant vapor has been passing through the system, the valve may show steam-cleaned spots or carbon contamination that affects its operation. Many shops replace both components together to avoid a repeat failure, and both are stocked in the same EGR & Aftertreatment category.

What tools and parts do you need to replace an EGR cooler?

You’ll need basic hand tools, a torque wrench, a drain pan, the replacement cooler itself, new gaskets and seals, and fresh coolant. Since the old gaskets should never be reused, pick up matching gaskets and seals along with the cooler so the job doesn’t stall waiting on a second part order.

Why is it important to bleed the cooling system after replacing an EGR cooler?

Trapped air left in the system after a refill can cause overheating, poor heater performance, and coolant level readings that look wrong even when the system is properly filled. Bleeding the system per the manufacturer’s procedure after refilling is what allows an accurate final check for leaks and proper coolant level.

How do I find the right EGR cooler for my specific engine?

Match the cooler to your engine make, model, and year, since fitment varies even within the same manufacturer’s lineup. If you’re not sure which part number applies, Highway & Heavy Parts’ ASE-certified technicians can help you confirm the correct cooler and any related parts before you order.

Posted on

Detroit Gen 6 Engines: What the New DD13, DD15, and DD16 Mean for 2027–2028

Detroit recently unveiled its new Gen 6 heavy-duty engine lineup, including the:

  • DD13,
  • DD15,
  • and DD16,

with production beginning in January 2027 for the DD13 and DD15, followed by the DD16 in January 2028.


Continue reading Detroit Gen 6 Engines: What the New DD13, DD15, and DD16 Mean for 2027–2028
Posted on

DuraWRX DEF Headers: Why One Small Component Can Shut Down an Entire Truck

Modern diesel engines are cleaner and more efficient than ever before, but they’ve also become far more dependent on electronics. Today, a relatively small component inside your Diesel Exhaust Fluid (DEF) system can take an otherwise healthy truck completely out of service.

One of the most common examples is the DEF header assembly.

If the DEF header fails—or if the Engine Control Module (ECM) receives inaccurate information from it—the truck may begin a series of emissions derates that reduce engine power and vehicle speed until repairs are made.

For fleets, owner-operators, and repair shops, that means lost productivity, missed deliveries, and unnecessary downtime.

That’s why Highway and Heavy Parts now offers DuraWRX™ DEF Management Solutions by Shaw Development—premium DEF headers and sensors engineered specifically for demanding commercial diesel applications and backed by an industry-leading 2-year warranty.

DuraWRX DEF Header Assembly

DuraWRX DEF Header Assembly by Shaw Development


What Does a DEF Header Actually Do?

Many people think the DEF tank simply stores fluid.

In reality, the DEF header is one of the most important components inside the entire Selective Catalytic Reduction (SCR) system.

A modern DEF header continuously monitors:

  • DEF fluid level
  • DEF temperature
  • DEF quality
  • Heater operation
  • Fluid pickup
  • Electrical communication with the ECM
What the DEF Header Monitors
DEF Level
Measures how much fluid is in the tank.
DEF Temperature
Helps manage cold-weather operation and thawing.
DEF Quality
Verifies proper fluid concentration.
Heating Function
Supports DEF flow during freezing conditions.
Fluid Pickup
Draws DEF from the tank for system use.
ECM Communication
Sends critical data to the engine control system.

The ECM depends on this information to determine whether the emissions system is functioning correctly.

If any of that information becomes inaccurate—or communication is lost—the ECM cannot verify emissions compliance. Instead of assuming everything is fine, it begins protecting the system by progressively limiting engine performance.

New to DEF Systems?

Before diagnosing a DEF header, it helps to understand how DEF works and what happens when diesel engines sit too long. These guides explain the basics behind DEF fluid, SCR systems, crystallization, fuel aging, and emissions-related downtime.
DEF Basics
Learn what Diesel Exhaust Fluid does, how SCR systems use it, and what happens if DEF runs out.
Read the DEF guide
Sitting Too Long
Learn how fuel degradation, DEF crystallization, moisture, and internal engine issues can show up after a truck sits.
Read the diesel storage guide

Why DEF Header Failures Cause So Much Downtime

Unlike many engine failures, DEF system problems often have nothing to do with the mechanical health of the engine itself.

Your truck may continue running perfectly while a sensor begins reporting inaccurate information.

Eventually, the ECM responds by initiating an emissions derate.

This usually progresses through several stages:

Typical DEF Failure Progression
1
Warning Light
2
Fault Codes
3
Engine Derate
4
Reduced Speed
5
Truck Down

The actual replacement component may represent only a fraction of the repair cost. The real expense often comes from technician labor, missed deliveries, idle equipment, and lost revenue.


Why DEF Headers Fail

DEF components operate in one of the harshest environments on the truck.

They’re constantly exposed to:

  • Daily freeze/thaw cycles
  • Road vibration
  • Moisture
  • Road salt
  • Diesel exhaust heat
  • DEF crystallization

Over time, these conditions can affect electrical connectors, heating elements, sensor calibration, seals, and internal electronics.

Some of the most common causes include:

  • DEF crystallization around sensors
  • Moisture intrusion
  • Connector corrosion
  • Wiring fatigue
  • Thermal cycling
  • Internal electronic failures

Diagnosing the Problem Correctly

Replacing the first component mentioned by a fault code isn’t always the right repair.

A proper diagnosis should include:

  1. Retrieve active and stored fault codes.
  2. Inspect DEF fluid quality and contamination.
  3. Examine the tank for crystallization or debris.
  4. Verify wiring, connectors, power, and grounds.
  5. Confirm communication between the ECM and DEF components.
  6. Install the correct replacement component.
  7. Clear codes and validate system operation.

This approach helps prevent unnecessary parts replacement and repeat repairs.


Why Choose DuraWRX?

Highway and Heavy Parts partners with Shaw Development, one of the industry’s leading manufacturers of DEF management systems, to provide premium aftermarket solutions for commercial diesel engines.

DuraWRX components are engineered to meet or exceed OE specifications while helping fleets reduce downtime and improve long-term reliability.

Features include:

  • OE-style fit and connectors
  • Precision-calibrated sensors
  • Corrosion-resistant materials
  • Heavy-duty construction
  • Commercial diesel applications
  • Industry-leading 2-year warranty
Why Shops Choose DuraWRX
OE-Style Fit
Designed for straightforward replacement.
Commercial-Duty Design
Built for demanding diesel applications.
Sensor Accuracy
Supports reliable DEF system readings.
Corrosion Resistance
Helps withstand moisture and road conditions.
Technical Support
Backed by HHP application help.
2-Year Warranty
Provides added confidence in the repair.

Available DuraWRX Solutions

Highway and Heavy Parts offers a growing lineup of DuraWRX DEF management components, including:

  • DEF Header Assemblies
  • DEF Quality Sensors
  • DEF Heating Components
  • OE-Style Replacement DEF System Components

Whether you’re repairing a single truck or maintaining an entire fleet, our ASE Certified Technicians can help verify the correct application before you order.


Need Help Diagnosing a DEF System Problem?

Modern emissions systems have become one of the leading causes of unexpected diesel truck downtime—but many repairs can be completed correctly the first time with proper diagnostics and quality replacement components.

Highway and Heavy Parts combines premium DuraWRX DEF management solutions with experienced ASE Certified Technical Support to help repair shops and fleet operators minimize downtime and restore dependable operation.

Call 844-304-7688 or visit highwayandheavyparts.com to find the right DuraWRX DEF components for your application.

From diagnosis through delivery, we’re Highway and Heavy Parts.

Posted on

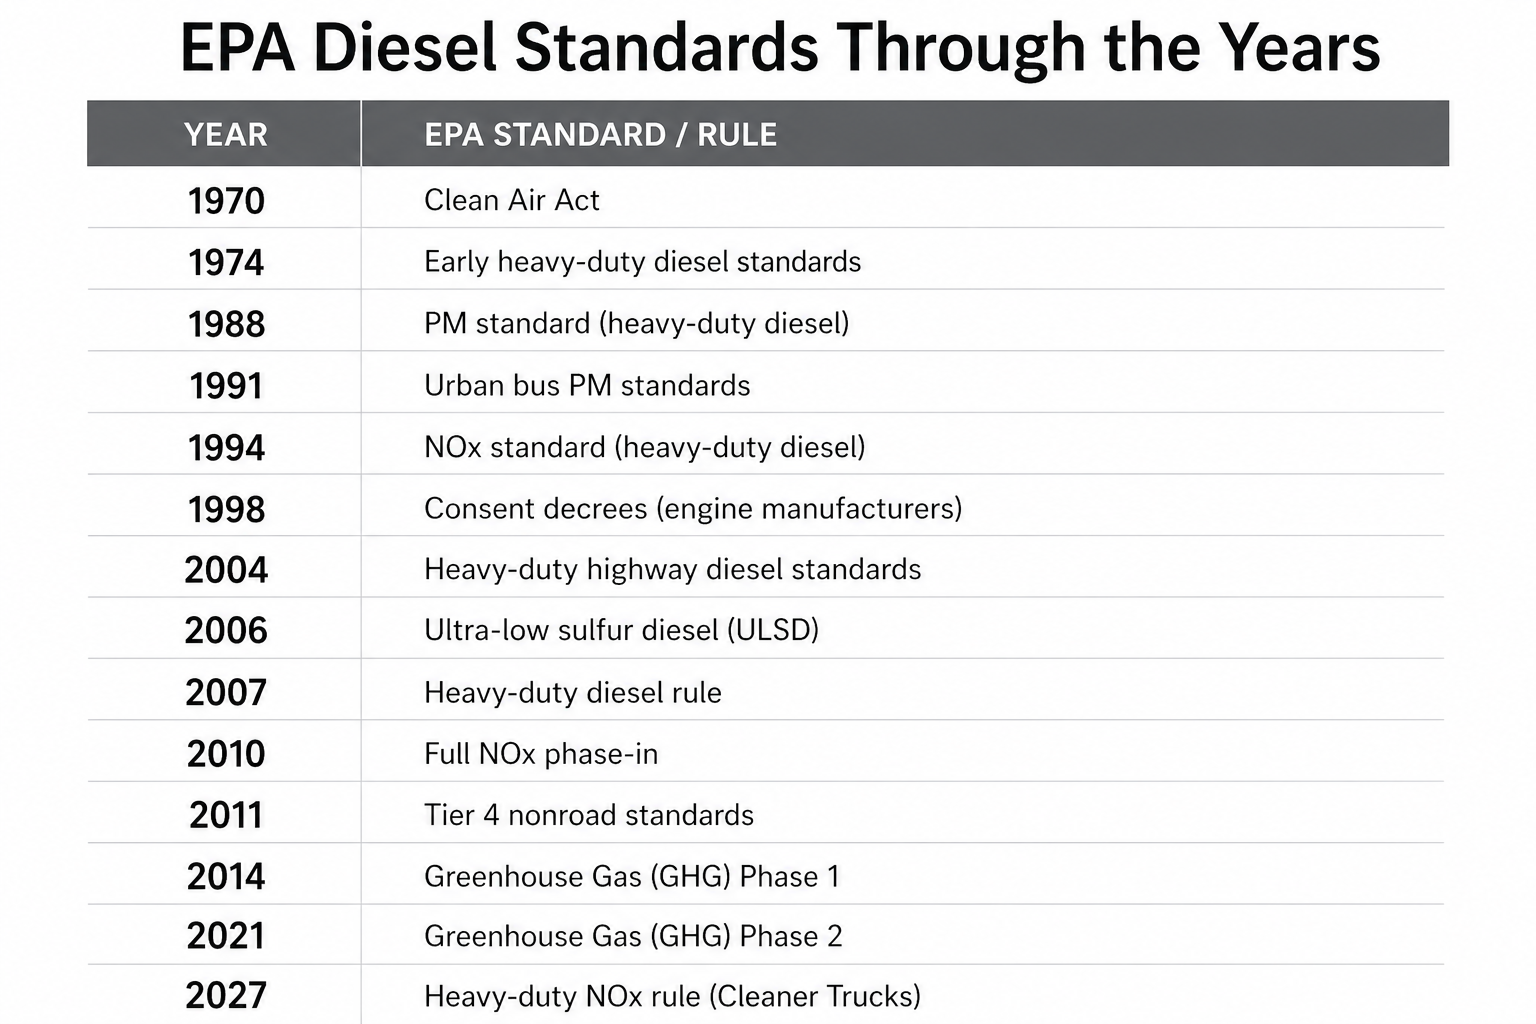
History of Vehicle Emissions Regulations: From Smog Controls to Modern Diesel Standards

EPA diesel emissions standards timeline chart showing major regulations from 1970 to 2027 including Clean Air Act, ULSD, Tier 4, and NOx rules

Vehicle emissions regulations did not happen all at once.

They developed over decades as engineers, regulators, and manufacturers responded to air quality problems caused by hydrocarbons, carbon monoxide, nitrogen oxides, particulate matter, and later greenhouse gas emissions.

For diesel engines, the biggest changes came when regulations began focusing more heavily on particulate matter, NOx, fuel sulfur levels, and aftertreatment systems.

Continue reading History of Vehicle Emissions Regulations: From Smog Controls to Modern Diesel Standards
Posted on

Highway & Heavy Parts Answers Your Diesel Engine Questions: Turbochargers

Here at Highway & Heavy Parts, we sell a lot of turbochargers. We carry a number of the industry’s leading brands for all major OEMs, and have helped diagnose a lot of our customers’ turbo failures. We provide solutions to help get them back on the road.

Continue reading Highway & Heavy Parts Answers Your Diesel Engine Questions: Turbochargers
Posted on

What’s New at Highway and Heavy Parts

At Highway and Heavy Parts, we’re always working to improve how we support diesel repair shops and equipment owners. While our commitment to quality parts, fast shipping, and real technical support hasn’t changed, we’ve added new tools, products, and ways to stay connected.

Continue reading What’s New at Highway and Heavy Parts
Posted on

Meet the Experts at HHP: Andy Thompson

We spend a lot of time talking about diesel engine parts – but today, we want to shift the focus to something just as important: the people behind it all.

If you’ve ever called in, asked a question, or needed help finding the right part, chances are you’ve already experienced what makes our team different. This is your chance to get to know one of those people a little better.

Continue reading Meet the Experts at HHP: Andy Thompson
Posted on

Best Apps for Truck Drivers in 2026 (Navigation, Fuel, Weather & More)

Modern trucking depends on more than just the truck itself.

Mobile applications now play a critical role in:

  • Route planning
  • Fuel cost management
  • Compliance and documentation
  • Weather awareness
  • Load sourcing

👉 The right trucking apps help reduce downtime, improve efficiency, and support safer decision-making on the road.

Below is a breakdown of widely used trucking apps in 2026, organized by function.

Continue reading Best Apps for Truck Drivers in 2026 (Navigation, Fuel, Weather & More)
Posted on

Most Popular Diesel Engine Parts of 2026

These are some of the most in-demand diesel engine components in 2026.

Each product below is selected based on:

  • High application demand
  • Proven reliability
  • Common rebuild and repair needs
Continue reading Most Popular Diesel Engine Parts of 2026