Is your fuel efficiency down? Has the performance of your CAT C15 ACERT dropped?
Continue reading When to Replace Fuel Injectors in a Caterpillar C15 AcertTag: Replacement Guide
Cummins N14 Fuel Injectors: How They Fail, What It Affects, and When to Replace Them

On a Cummins N14, fuel injectors are one of the most critical components controlling engine performance.
They don’t just deliver fuel – they control timing, atomization, and combustion efficiency.
And when they start to fail, the issue doesn’t stay isolated to one cylinder. It begins to affect engine balance, temperature, and long-term durability.
Continue reading Cummins N14 Fuel Injectors: How They Fail, What It Affects, and When to Replace ThemWhen Should You Replace Your CAT C15 ACERT Diesel Engine Turbo?
As you probably know, one of the main differences between the Caterpillar C15 diesel engine and the C15 ACERT is the fact that the ACERT is designed with two turbochargers. That makes this component even more vital to the overall function and health of your diesel engine.
Continue reading When Should You Replace Your CAT C15 ACERT Diesel Engine Turbo?When Do You Need New Fuel Injectors for Your Cat C15 ACERT Diesel Engine?
Has the performance of your CAT C15 ACERT taken a dive? Are you going through a lot more fuel than you used to?
Continue reading When Do You Need New Fuel Injectors for Your Cat C15 ACERT Diesel Engine?Detroit Diesel Series 60 14L Turbocharger: Symptoms, Failure Causes, and When to Replace

The turbocharger on a Detroit Diesel Series 60 14L engine does more than add power.
It controls airflow, and airflow controls combustion.
When the turbo isn’t performing correctly, the entire engine starts to fall out of balance.
Continue reading Detroit Diesel Series 60 14L Turbocharger: Symptoms, Failure Causes, and When to ReplaceHow to Replace a Camshaft on a Caterpillar C15 (Step-by-Step Guide)
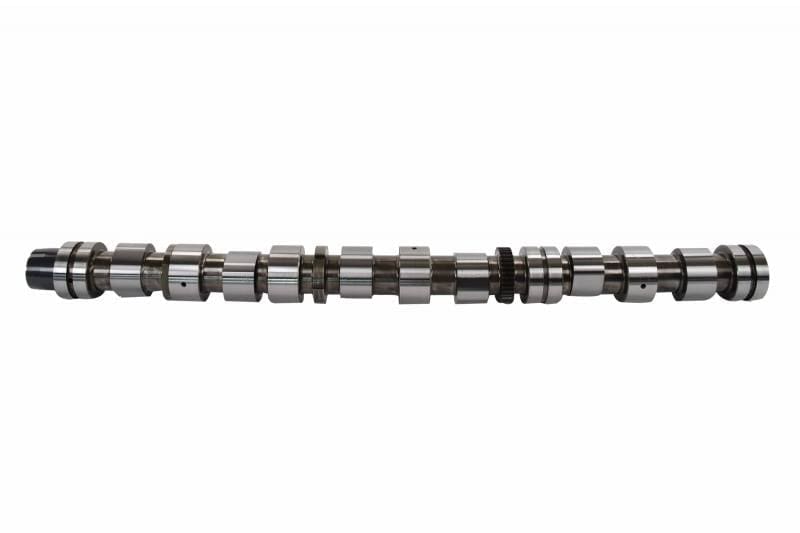
The camshaft plays a critical role in how your engine runs.
On a Caterpillar C15 diesel engine, even minor camshaft wear can affect:
- Valve timing
- Fuel delivery performance
- Overall engine efficiency
👉 If the camshaft fails, it can lead to serious internal engine damage.
A Caterpillar C15 camshaft replacement is not a small job. It requires proper timing, precision, and a clear understanding of the engine’s setup.

Signs of a Bad Camshaft
Before a Caterpillar C15 camshaft replacement, it’s important to confirm the failure.
Before jumping into a full replacement, it’s important to confirm the camshaft is actually the issue.
👉 If you’re not sure yet, this guide breaks down the symptoms and failure causes in detail:
Caterpillar C15, 3406E Camshaft Guide
Common symptoms include:
- Loss Of Power Under Load
- Rough Idle Or Engine Stalling
- Excessive Engine Noise (Knocking Or Ticking)
- Reduced Fuel Economy
- Hard Starting Or No Start Condition
Even small wear can affect performance.
👉 As little as .001″ wear can change valve timing by several degrees, impacting how the engine runs.
What Causes Camshaft Failure on a C15
Camshaft failure is rarely random.
Most failures are caused by:
- Poor Lubrication (Oil Issues)
- Contaminated Engine Oil
- Worn Rollers Or Lifters
- Improper Installation From Previous Repairs
👉 Before installing a new camshaft, always identify the root cause to prevent repeat failure.
How to Replace a Caterpillar C15 Camshaft
This is a high-level process. Exact procedures may vary depending on your engine configuration.
1. Preparation
- Disconnect batteries
- Drain engine oil
- Remove valve covers
- Inspect visible valvetrain components
2. Set Engine to Top Dead Center (TDC)
Rotate the engine and lock it at Top Dead Center (TDC).
- Use a timing pin to secure the flywheel
- This ensures proper timing during reassembly
👉 This step is critical – incorrect timing can cause engine damage.
3. Remove Front Timing Components
- Remove the front timing cover (“peanut cover”)
- Gain access to the cam gear
4. Remove the Cam Gear
- Use a proper gear puller or removal tool
- Carefully remove the cam gear without damaging surrounding components
5. Remove Rocker Assemblies
- Remove rocker arms and shaft assemblies
- Keep components organized for reinstallation
6. Remove the Camshaft
- Carefully slide the camshaft out
- Avoid damaging cam bearings during removal
👉 This is where many installs go wrong – any scoring or damage can lead to premature failure.
7. Inspect and Replace Bearings
- Always install new camshaft bearings
- Inspect for wear, scoring, or oiling issues
8. Install the New Camshaft
- Lubricate bearings and camshaft thoroughly
- Carefully slide the new camshaft into place
9. Reinstall Components and Set Timing
- Reinstall cam gear
- Align timing marks correctly (typically 12 o’clock alignment)
- Install retainer plate and torque bolts properly
👉 Camshaft bolt torque: ~180 ft-lbs (verify per spec)
10. Final Assembly
- Reinstall rocker assemblies
- Set valve lash to specification
- Reinstall timing cover and remaining components
Important Installation Tips
When replacing a camshaft on a C15, pay attention to:
- Always Verify Fitment Using ESN
- Replace Bearings and Related Components
- Keep All Components Clean
- Follow Torque Specifications Exactly
- Double-Check Timing Alignment
👉 One mistake here can lead to complete engine failure.
Why Camshaft Installs Fail (And How to Prevent It)
Most repeat failures are caused by:
- Reusing worn components
- Improper timing alignment
- Skipping bearing replacement
- Not addressing oil system issues
👉 A camshaft replacement is not just a part swap – it’s a system repair.
At Highway and Heavy Parts, we help you identify the problem and get the right parts the first time.
Call 844-304-7688 or visit highwayandheavyparts.com to place your order today.
From diagnosis through delivery, we’re Highway and Heavy Parts.


